Prerequisites
This page describes the setup steps for printing PocketFlash receipts and reports from an Android or iOS mobile device to a Bluetooth-connected Zebra QLn420 printer.
IMPORTANT: Due to Apple restrictions and limitations, the ability to print to a Bluetooth-connected printer has been temporarily removed from the iOS application (as of app version 4.2.7). Printing is still valid for Android devices, but not for iOS.
Some of the steps on this page pertain only to Android mobile devices while other steps pertain only to iOS mobile devices. If not specifically stated then the step is common to all devices. Not all steps may be necessary, depending on how the Zebra printer is configured when it is shipped to you.
A number of the steps below require three basic conditions: 1) The mobile device has Bluetooth turned on, 2) The Zebra printer is turned on, and 3) The mobile device and the Zebra printer are within Bluetooth range. If performing a step fails, verify that these three conditions are true.
Android Printer Setup Utility
Step 1: Download And Install App
 To
quickly determine if Bluetooth connectivity is correctly configured on the printer and to easily modify various printer
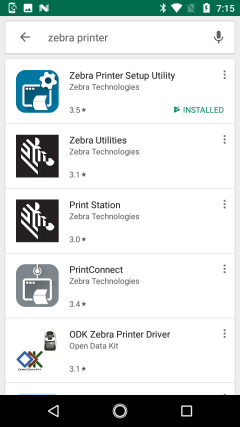
configuration values, open the Play Store app on the Android device and search for "zebra printer" (without the quotes).
One of the matching apps in the results list should be Zebra Printer Setup Utility. Download and install this application
to the Android device.
To
quickly determine if Bluetooth connectivity is correctly configured on the printer and to easily modify various printer
configuration values, open the Play Store app on the Android device and search for "zebra printer" (without the quotes).
One of the matching apps in the results list should be Zebra Printer Setup Utility. Download and install this application
to the Android device.
Step 2: Connect To The Printer
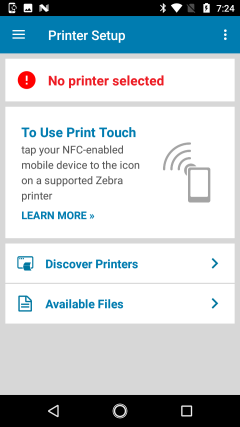
If necessary, turn on the Zebra printer. Then open the above installed Printer Setup app.
- The leftmost screen below will be displayed if 1) a printer has not been previously connected to this device using this app or 2) the previously connected printer has been deselected. For reasons 1 and 2, tap on Discover Printers and the middle screen (Step 2c) will be displayed.
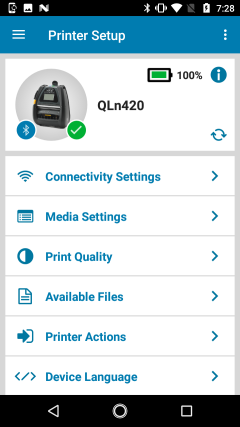
- The rightmost screen below will be displayed if a printer has been connected to this device and selected using this
app. Next to the printer icon will be a green checkmark or a red dash indicating a connected or disconnected status.
- If connected, proceed to Step 3.
- If disconnected and this device has been previously used to setup other printers, then the currently displayed selected printer may not be the desired printer. In this case, tap on the 3-line icon to the left of the screen title. Doing this will display the middle screen (Step 2c).
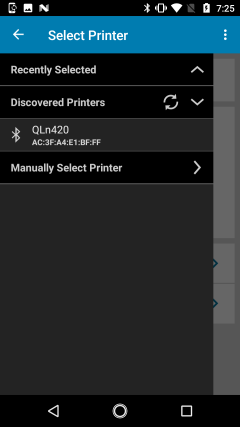
- The middle screen is displayed from either Step 2a or Step 2b above. The screen is used to find and select the printer
you wish to work with. When the screen is displayed, it may or may not automatically begin searching for discoverable
printers. To force a search, tap on the circular refresh icon to the right of Discovered Printers. The searching will
display any discovered printers in the list as it finds them. The list of discovered printers will show a friendly name and
MAC address for each printer. You can verify which printer in the list is the desired printer by comparing the displayed MAC
address to the Bluetooth label on the bottom of the printer.
- If no discoverable printers show in the list or if the desired printer does not show in the list, then the printer's Bluetooth configuration will need to be modified using the setup utility for Windows. described later on this page.
- If the desired printer shows in the list, tap on it to establish connection and make it the selected printer. A popup message might be displayed asking you to verify and accept a pairing pin. The acceptance must be done on both the Android device and on the printer. After a successful connection, the rightmost screen below is displayed (Step 2b).
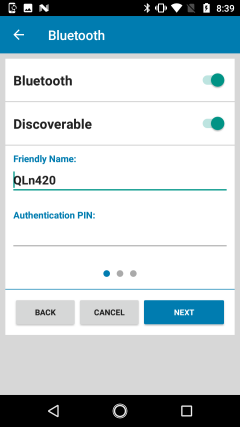
Step 3: Verify Bluetooth Configuration
Tap Connectivity Settings on the main screen. Then on the Connectivity Settings screen select Bluetooth.
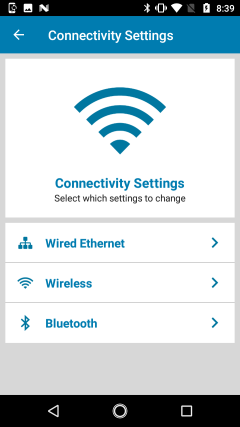
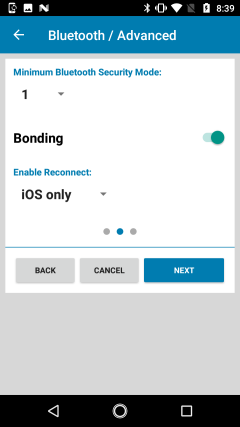
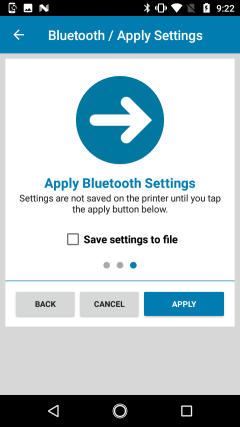
The screens below show the recommended Bluetooth configuration settings. If the app does not show a friendly name for the printer or if you would like a friendly name other than what is displayed, you may enter a new name. The friendly name is not used for anything other than a way for you to more easily recognize the printer in selection lists.
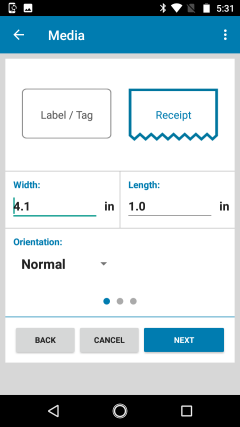
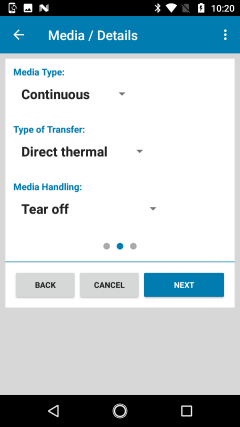
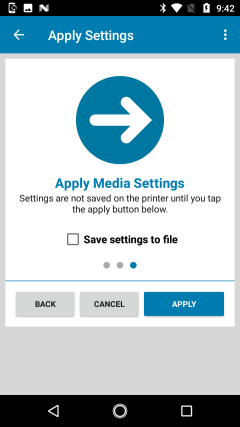
Step 4: Verify Media Configuration
Tap Media Settings on the main screen. Then on the Media Settings screen select Media Settings.
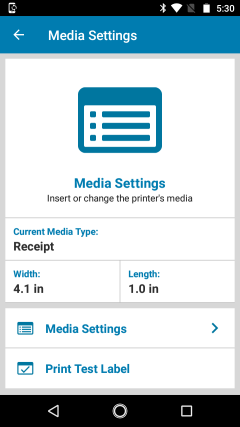
The screens below show the recommended media configuration settings.
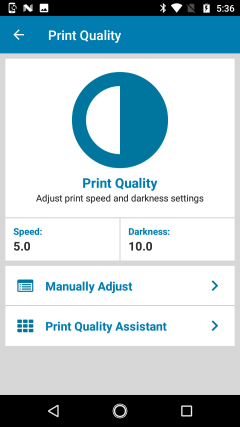
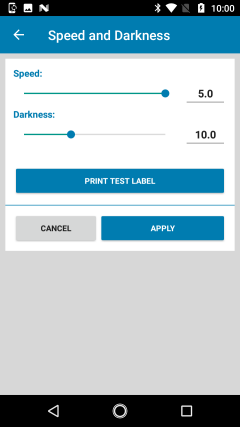
Step 5: Verify Quality Configuration
Tap Print Quality on the main screen. Then on the Print Quality screen select Manually Adjust. The recommended settings are shown below.
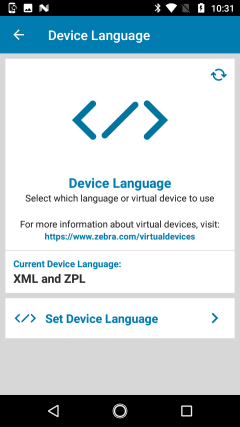
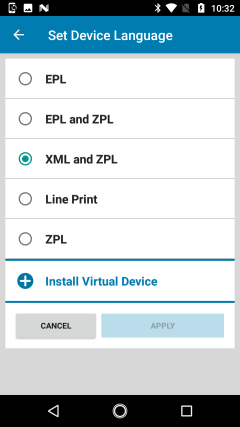
Step 6: Verify Language Configuration
Tap Device Language on the main screen. Then on the Device Language screen select Set Device Language. The recommended settings are shown below.
iOS Printer Setup Utility
Zebra does not provide a printer setup utility for iOS devices, just for Android. It is therefore necessary to manually connect and pair the iOS mobile device with the Zebra printer. Additionally, any customization of printer configuration settings will need to be made with either the Windows Printer Setup Utility or the Zebra Printer Built-In Utility or both.
Step 1: Connect To The Printer
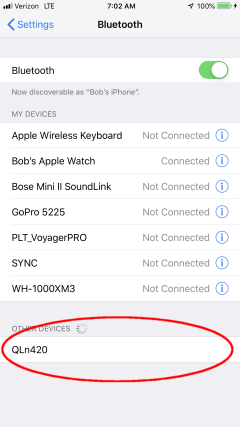
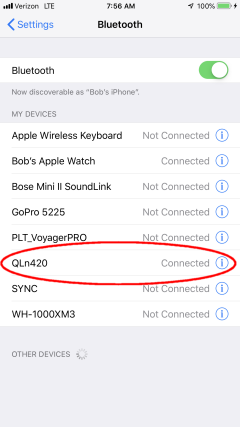
If necessary, turn on the Zebra printer. Then on the mobile device, go to Settings > Bluetooth. If Bluetooth is not already turned on, turn it on. The lower portion of the screen under Other Devices (left sample below) will show discovered Bluetooth devices that have not yet been connected and paired There should be an entry for the Zebra Bluetooth printer (its name might be different than shown in the sample). It might take a few seconds for the printer to appear. Tap on the printer entry and the printer will then connect and auto-pair and show in the list of My Devices as being connected (right sample below). The printer is now available for printing in the PocketFlash app.
If the printer does not show on the screen, then most likely its Bluetooth connection settings need to be modified. Use the Windows Printer Setup Utility below to do this, then return here to this step.
Windows Printer Setup Utility
To use this software, you will be connecting the printer to a Windows PC using a compatible USB cable. If the PC does not already have the software installed, DO NOT connect the printer to the PC until instructed to do so during the software installation process. The required Zebra printer drivers are not available until a certain point is reached within the install. Connecting the printer prematurely will cause Windows to attempt installing drivers that don't yet exist on the PC.
The printer setup program for Windows allows for some of the same printer configuration parameters to be specified as the printer setup App for Android described above; however, changing some parameters with this program sometimes seems to have no affect. Another noticeable difference is the Android app queries the printer for its current configuration and displays it to you. The Windows program does not do that, or at least not very well. So it is possible to make configuration changes and then review the same steps again and not see the values that were just entered.
Despite its shortcomings, using this program is the only way to modify the printer's Bluetooth connection settings so the printer will be discovered and recognized by the mobile device.
Step 1: Download And Install Program
The printer setup utilities installer can be downloaded from the Zebra QLn420 printer support page. Scroll down the page and look for Zebra Setup Utilities for Windows. After downloading the installer file, click on it to run it. Follow the instructions that the installer displays on the PC's monitor.
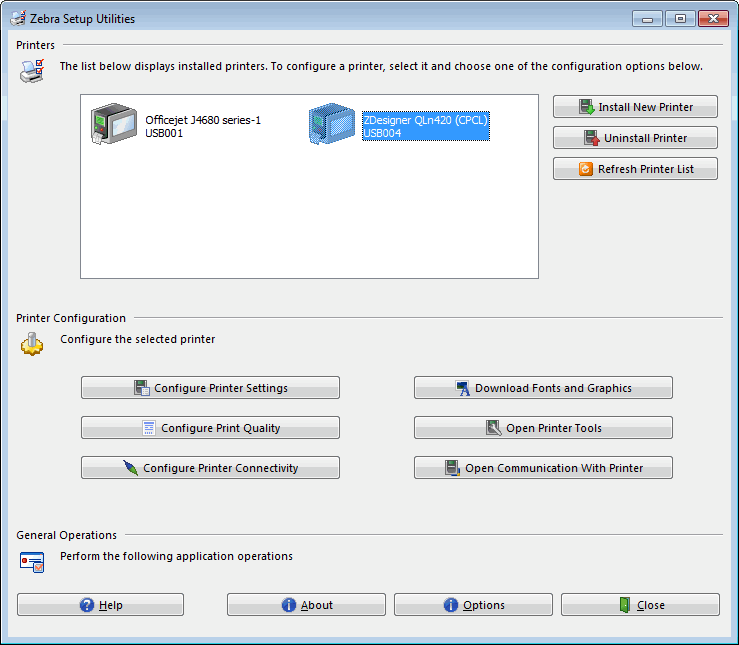
Step 2: Select Printer To Configure
Open the above installed Zebra Setup Utilities program and select the Zebra printer to configure. The printer will have a ZDesigner name similar to the sample below. If a Zebra printer doesn't show, verify the USB connection and that the printer is turned on, then click the Refresh Printer List button. If a Zebra printer still doesn't show, then it's possible the printer drivers did not properly install. Click on the Install New Printer button and follow the instructions on the monitor.
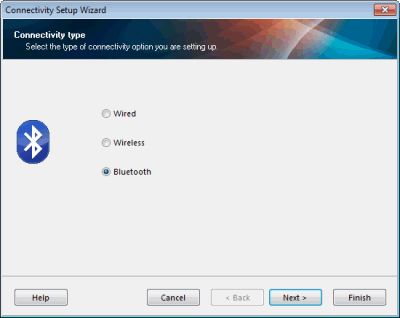
Step 3: Configure Bluetooth Connection
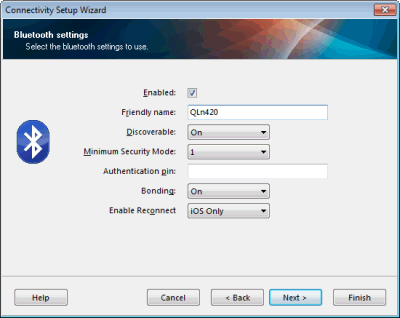
Click on the Configure Printer Connectivity button on the main screen (above). Then on the first Connectivity Setup Wizard screen (below) select Bluetooth and click Next. The second Connectivity Setup Wizard screen (below) shows the recommended Bluetooth configuration settings. If the program does not show a friendly name for the printer or if you would like a friendly name other than what is displayed, you may enter a new name. The friendly name is not used for anything other than a way for you to more easily recognize the printer in selection lists. After making your changes, click Finish. Your changes are then sent to the printer, after which a soft reset is performed on the printer.
Step 4: Manual Printer Configuration
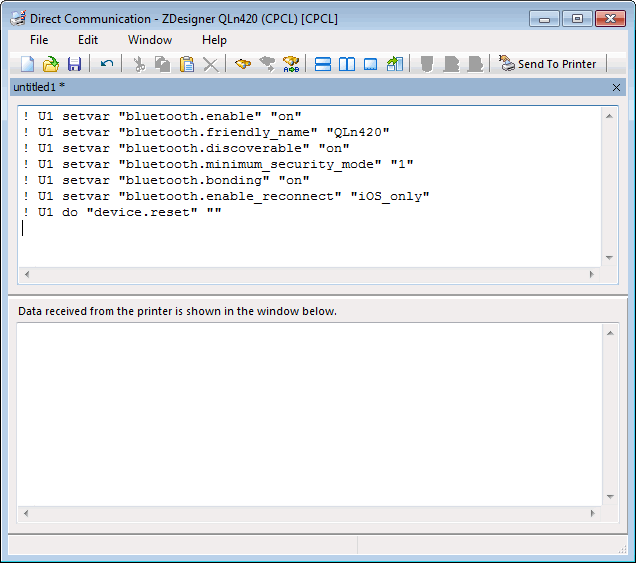
Per the Zebra Printer Notes/Issues at the end of this page, it might be necessary to manually send one or more configuration commands to the printer. To do this, click on the Open Communications With Printer button on the main screen (above). The Direct Communication screen (below) is displayed. Commands are entered in the upper half of the screen. Any feedback from the printer is displayed in the lower half. Note that any commands entered MUST be followed by a blank line. Click on the Send To Printer button in the upper right to send the entered command(s) to the printer.
As an example, the sample below shows commands that are sent to the printer to configure Bluetooth.
Zebra Printer Built-in Utility
The Zebra printer provides for additional configuration changes via its built-in LCD panel's configuration options. Values such as LCD contrast, LCD backlight timeout, power timeout, etc. can be modified using the LCD panel and buttons. See the supplied documentation for the printer on how to use the printer's built-in configuration options. The printer documentation is also available from the Zebra QLn420 printer support page.
PocketFlash Bluetooth Permissions
For iOS devices, nothing needs to be done here. The necessary permissions are automatically set when the PocketFlash app is installed on the mobile device (last verified with iOS version 12.1.4).
In order for the PocketFlash app to use Bluetooth on Android devices with operating system versions 6.0 and higher, the app must be given permissions to Location services. If Location permissions are not granted, then the app will be unable to communicate with a Bluetooth printer.
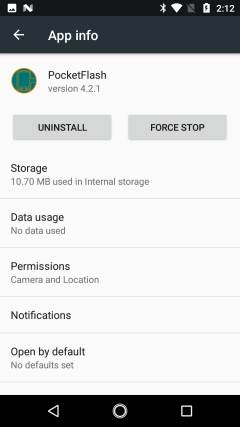
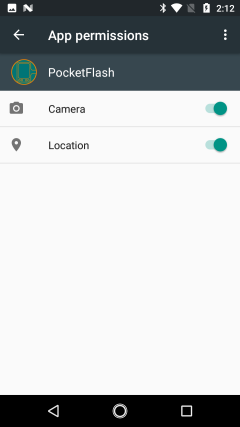
To set Location permissions for the app, on the Android device go to Settings > Apps > PocketFlash. Per the sample screens below, tap on Permissions (left screen) and then tap on Location so it is selected (right screen).
PocketFlash Bluetooth Printing
IMPORTANT: Due to Apple restrictions and limitations, the ability to print to a Bluetooth-connected printer has been temporarily removed from the iOS application (as of app version 4.2.7). Printing is still valid for Android devices, but not for iOS.
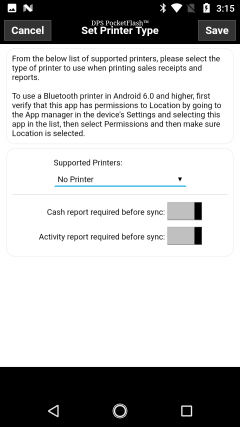
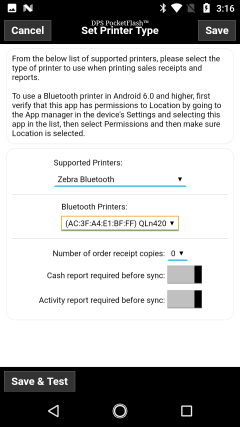
In order for the PocketFlash app to print receipts and reports to a Bluetooth printer, the app must know which printer is to be used. The app's Settings screen for Set Printer Type is where the desired printer is identified. The following outlines the steps that occur to accomplish this. The below screen samples are from an Android mobile device. The screens for an iOS mobile device are nearly identical.
 When the
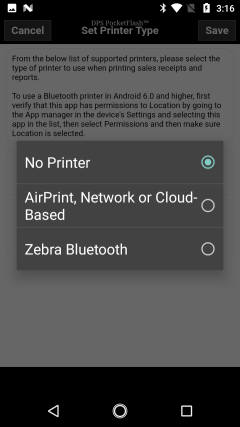
Set Printer Type screen is first displayed, no printer is selected. The list of Supported Printers includes a selection for Zebra Bluetooth.
When the
Set Printer Type screen is first displayed, no printer is selected. The list of Supported Printers includes a selection for Zebra Bluetooth.
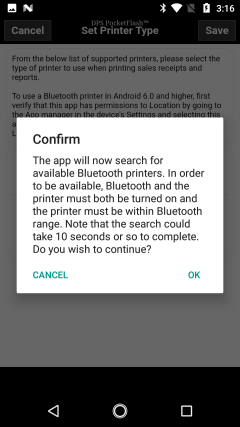
 When Zebra
Bluetooth is selected, a message is displayed informing you that the app is about to search for available Bluetooth printers.
Tapping OK will start the search for printers and the screen will indicate that the search is being processed.
When Zebra
Bluetooth is selected, a message is displayed informing you that the app is about to search for available Bluetooth printers.
Tapping OK will start the search for printers and the screen will indicate that the search is being processed.
 If no
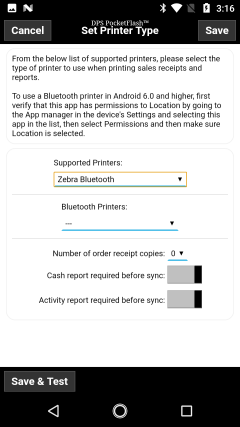
Bluetooth printers are found, a message will be displayed indicating so; otherwise, a selection list of Bluetooth Printers appears
on the screen. For each printer found by an Android mobile device, the list will show the printer's Bluetooth MAC address and friendly name.
For each printer found by an iOS mobile device, the list will show the printer's serial number and friendly name.
If no
Bluetooth printers are found, a message will be displayed indicating so; otherwise, a selection list of Bluetooth Printers appears
on the screen. For each printer found by an Android mobile device, the list will show the printer's Bluetooth MAC address and friendly name.
For each printer found by an iOS mobile device, the list will show the printer's serial number and friendly name.
 After
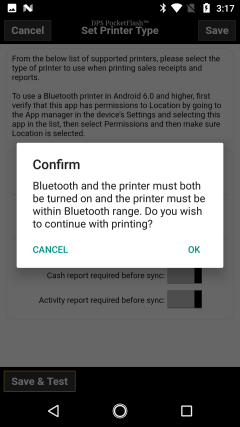
selecting the desired printer, a test report can then be printed. Tap on the Save & Test button in the lower left of the screen.
After the Save completes, a message is displayed asking you to confirm that you are ready to print. This same message is displayed
throughout the app any time printing is attempted.
After
selecting the desired printer, a test report can then be printed. Tap on the Save & Test button in the lower left of the screen.
After the Save completes, a message is displayed asking you to confirm that you are ready to print. This same message is displayed
throughout the app any time printing is attempted.
The test report includes the footer that prints at the bottom of order receipts. The PocketFlash help contains instructions for how to edit the receipt footer for the Android/iOS app.
NOTE: Any time printing is performed within the PocketFlash app, the entire screen is disabled to prevent any user interaction during the print processing. The screen will have a light gray appearance while it is disabled. After printing completes, the screen will once again become enabled and the light gray appearance will disappear. On some devices it might take a couple seconds or so after printing for the screen to re-enable. This is because the app is waiting for confirmation from the printer that the printing has been completed.
Zebra Printer Notes/Issues
- Zebra QLn420
- The QLn420 printer is the recommended printer for use with PocketFlash. Detailed information on the QLn420 is available from the Zebra QLn Series Mobile Printers web page.
- The Zebra part number for the printer used to develop and test the PocketFlash printing functions is QN4-AUNA0M00-00. This printer's paper holders (media supports) in the printer accommodate paper that has a 0.75"/19mm inside diameter (see item c below). The QLn420 can also be equipped to accommodate paper that has a 1.375"/34.9mm inside diameter; however, continuous roll receipt paper for this configuration does not seem to exist.
- The Zebra part numbers for the printer paper used to develop and test the PocketFlash printing functions are as follows:
- LD-R4KN5B (4000D 3.2 MIL 4" Continuous Receipt)
- 10001965 (8000D 3.2 MIL 4" Continuous High-Temp Receipt)
- 10006224 (1000D 2.4 MIL 4" Continuous Receipt)
- When the printer has been inactive for its configured timeout period, the printer completely powers off (vs. going into a sleep or hybernate mode). Any subsequent attempts to communicate with the printer will fail until the printer is turned back on. The configured timeout period can be adjusted on the printer's LCD panel in the battery settings. Setting the timeout value to zero disables automatic power off; in which case the printer must be manually turned off to conserve battery power.
- Some printers (but not all) have a factory setting that causes the printer to feed an excessive amount of paper when the printer cover
(media cover) is closed and/or when the form feed button on the printer is pressed. None of the readily available configuration
changes that can be made using the Android setup utility or the Windows setup utility seem
to have a lasting effect. These two behaviors can, however, be permanently changed by manually entering a few configuration commands
via the Windows setup utility's Manual Printer Configuration.
- To change the amount of paper that the printer feeds when the cover is closed or the form feed button is pressed, process the following
commands:
! U1 setff 100 5
! U1 setvar "zpl.save" ""
! U1 do "device.reset" ""
The number 100 in the first command is form feed distance expressed as points. There are 203.2 points per vertical inch, so the sample command represents approximately 1/2". Note that the PocketFlash app automatically performs a 1/2" form feed after every receipt and report. Changing this configuration value is for printer hardware purposes only and has no bearing on what the PocketFlash app does. - To completely turn off any form feeding that occurs when the cover is closed, process the following commands:
! U1 setvar "ezpl.head_close_action" "no motion"
! U1 setvar "zpl.save" ""
! U1 do "device.reset" ""
- To change the amount of paper that the printer feeds when the cover is closed or the form feed button is pressed, process the following
commands:
- The printer does not possess as wide variety of built-in fonts as the O'Neil printers used by the Java PocketFlash app. Due to the
Zebra font limitations, it is impossible to produce receipts and reports that match exactly in appearance to those produced on the O'Neil
printers. The receipts and reports have the same basic layout and content but have a slightly different look to them.
- Zebra ZQ520
- The ZQ520 is a mobile printer similar to the QLn420. Zebra markets this printer as 'the most rugged premium printer for 4" applications'.
The printer's specifications with regard to connectivity, print speed, built-in font's, etc. are virtually identical to the QLn420. Because of
these similiarites, the ZQ520 should work with the PocketFlash app as well as the QLn420. DPS has not done any extensive testing of the ZQ520
to verify 100% compatibilty. Detailed information on the ZQ520 is available from the Zebra ZQ500 Series Mobile Printers web page.