Set Preferences
 The Set Preferences window is used to indicate how you would like certain processing options to be
handled.
The preferences that can be set are intended to help streamline the processing flow for users who are
intimately familiar with the handheld application and their company's business environment. Based on
your level of experience, some or all of the preferences may not be appropriate. Some or all of the
preferences may not be appropriate due to your company's required business practices.
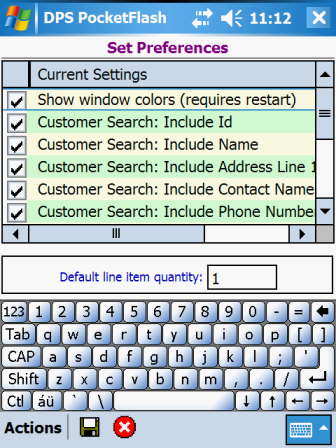
The upper portion of the window contains a scrollable list of preference options. The lower
portion of the window contains a single text entry field. Preference options are selected (checked) or
deselected (unchecked) by tapping on the appropriate checkbox.
Of the 12 preferences that can be manipulated, 1 pertains to the application in general, 5 pertain to
customer search and 6 pertain to order entry.
Application Preferences
The Set Preferences window is used to indicate how you would like certain processing options to be
handled.
The preferences that can be set are intended to help streamline the processing flow for users who are
intimately familiar with the handheld application and their company's business environment. Based on
your level of experience, some or all of the preferences may not be appropriate. Some or all of the
preferences may not be appropriate due to your company's required business practices.
The upper portion of the window contains a scrollable list of preference options. The lower
portion of the window contains a single text entry field. Preference options are selected (checked) or
deselected (unchecked) by tapping on the appropriate checkbox.
Of the 12 preferences that can be manipulated, 1 pertains to the application in general, 5 pertain to
customer search and 6 pertain to order entry.
Application Preferences
- Show windows colors (requires restart)
Checking this option indicates that you want to show colored text on all application windows. When the
application is installed, this option is checked by default. Checking or unchecking this option has no
effect on images and icons. Images and icons are always displayed with colors. Unchecking this
option is useful, for example, if you are using a device that has a monochrome display.
Customer Search Preferences
The 5 customer search preference options indicate which customer data fields are included when searching
for customers based on an entered text value. When the handheld application is installed, all 5
options are selected (checked), which means all 5 customer data fields are included in every text search.
Deselecting (unchecking) options can potentially make the search processing faster because fewer customer data
fields are being reviewed for matching values. The 5 customer search options are:
- Include Id
- Include Name
- Include Address Line 1
- Include Contact Name
- Include Phone Number
A minimum of one customer search option must be selected (checked). You cannot save your new
preference settings if all 5 options are deselected (unchecked).
Order Entry Preferences
The 6 order entry preference options allow you to customize various aspects of the order entry
processing flow. When the handheld application is installed, all 6 options are deselected (unchecked).
The 6 order entry options are:
- Bypass Customer Information
Checking this option indicates that you want to bypass the Customer Information
window when entering a new order.
- Bypassing the window occurs when moving forward through a new order. You can still back up to the
window, if desired. No bypassing occurs when editing or viewing an existing order.
- Bypass Order Information If PO Not Required
Checking this option indicates that you want to bypass the Order Information window
when entering a new order.
- Bypassing the window occurs when moving forward through a new order. You can still back up to the
window, if desired. No bypassing occurs if the customer associated with the order requires a purchase
order number. No bypassing also occurs when editing or viewing an existing order.
- Auto-Reset Entry If Product Not Found
This option determines what occurs after a "Product not found" message is displayed on the Order
Line Items window.
- The default installation behavior (unchecked) is to do nothing, meaning you must take some kind of action
(enter a different product code, search for a different product, rescan a barcode label, etc.) to resolve the
problem. When this option is checked, the Order Line Items window entry
fields are all automatically reset (blanked), thereby allowing you to restart your entry of the line item.
This behavior is the same as if you had tapped on the New menubar action.
- This option applies only when entering a new line item (vs. changing an existing line item) and when entry
of unknown products is not allowed.
- Assign Default Line Item Quantity
This option allows you to turn on/off default quantity assignment when entering new line items on the Order
Line Items window.
- Default quantity assignment occurs immediately after a line item's product has been identified.
After the default quantity is assigned, initial pricing of the line item is then calculated and displayed.
- The default installation behavior (unchecked) indicates no default quantity is assigned and no initial
pricing is performed, which means you must specify a quantity in order to complete and save each new order
line item.
- When this option is checked, you are required to enter a valid default quantity (see Data Fields
below).
- Reprice Line Item When Quantity Changes
Checking this option instructs the Order Line Items window to reprice the current
line item every time its quantity is changed, as the quantity changes.
- The installed default (unchecked) indicates repricing does not occur after every change in quantity.
This provides for quicker line item entry because fewer calculations are being performed while the line item
is being entered or changed.
- When this option is unchecked and a line item quantity is changed, you can cause the line item to be
repriced by simply tapping somewhere else on the screen; so the blinking cursor appears within another field,
such as the product code, unit of measure or unit price field. When the cursor moves from the quantity
field to another field, the line item is repriced. Tapping the Save action on the menubar will also
cause a line item to be repriced.
- Don't Price Line Items If Deliver Later
Checking this option can provide for quicker order entry by allowing you to bypass pricing calculations
performed on the Order Line Items window.
- The ability to bypass pricing calculations applies only to orders that have a delivery type of Deliver
Later. Deliver Later orders can be properly priced by the production system when the handheld orders are
synced to the server. This option can only be changed when there are no unsynchronized orders in the
handheld database.
- The installed default (unchecked) indicates prices are always calculated. When selected (checked),
prices are not calculated. If prices are not calculated, orders will not have any totals; which
therefore precludes the ability to accept cash, check or credit card payments and to verify available credit.
- All Deliver Later orders entered when this option is checked are assumed to be "on account"
orders. If a customer is not allowed to charge orders to their account, orders for the customer cannot
be entered. If a Deliver Later order is subsequently changed to Deliver Now, the order's line items are
automatically repriced.
- Any Deliver Later orders that originally were not priced are not automatically repriced if this option is
unchecked after the orders were entered. The Tools > Reprice Line Items menubar action on the Order
Line Items window can be selected to force an unpriced order to be repriced. Any repricing that is
performed only affects line items that do not have a forced price. Depending on the size of an order,
repricing could take several seconds to complete.
- Multiple Orders Per Customer
This option indicates which window is to be displayed after completing a new order.
- The installed default (unchecked) means that only one order is typically entered per customer and the next
window displayed after completing an order will be the Customer Selection window.
When this option is selected (checked), the next window displayed after completing an order will be the Customer
Information window.
Data Fields
- Current Settings
Optional. Checkbox.
Tap on a checkbox to indicate whether an option is selected (checked) or not selected (unchecked).
Although each individual setting is optional, a minimum of one customer search option must be selected
(checked).
- Default line item quantity
Optional. 5 numbers max.
Enter the quantity you would like initially defaulted into every order line item you enter. A valid
default quantity is any numeric value between 1 and 99999 inclusive. An entry is required here when the
"Order Entry: Assign Default Line Item Quantity" option is selected (checked).
Actions
- Tap
 to save your preference settings. A message
is displayed when the save processing has finished. You are then returned to the Functions
Menu window.
to save your preference settings. A message
is displayed when the save processing has finished. You are then returned to the Functions
Menu window.
- Tap
 to return to the Functions
Menu window. Any changes made are ignored.
to return to the Functions
Menu window. Any changes made are ignored.
See Also
Contents By Function
Contents By Window